Thursday, August 30, 2012

Thursday Pictures

It's a bit of busy day today, so I thought I would just share a few pictures with you.

The beautiful flowers my husband brought home for me last night, just because!


picture by Heather Christo
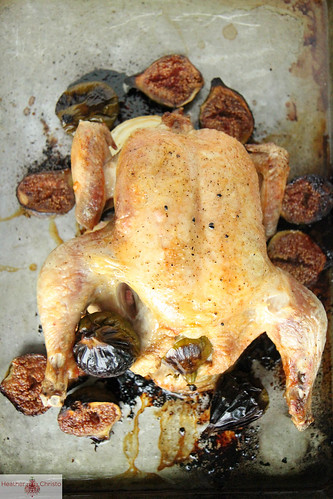
What we had for dinner last night: Roasted Chicken and Figs by Heather Christo


Look who found the stairs!!!

The kids and I made chocolate waffles this morning together.

Then we watched this video while we ate them: The Cat Came Back by The Muppets

I'm off to start the rest of my day: hanging with my kids, prepping for my online class tonight, and typing up part 2 of Ray's Birth Story which I will post tomorrow (you can find part 1 here).

Be sure to enter my giveaway if you haven't already!  

What are you up to today? Any fun Labor Day weekend plans? 


Wednesday, August 29, 2012

New Blog Feature

I am very excited to officially announce my latest blog feature. Some of you may have noticed that I recently added a link at the top of my blog to a new page called "Classes." This page allows me to post information about the weekly classes I teach locally and online about essential oils. I am enjoying the opportunity to share all the wonderful things I have learned about oils and their uses with others.


The topics I will be teaching on in the next month are:

*Nature's Medicine Cabinet - a basic class on reinventing healthcare in the home using essential oils

*Essential Oils in Maternity - empowering women during maternity, labor and delivery, postpartum and well baby care with essential oils

*Homemade Cleaners and Spa Products - learn how to make your own cleaners and spa products that are natural, organic, effective and safe  for even the smallest of users

Click here to see a complete list of class times and topics.

*****For a limited time I will also be offering a free gift to each local class attendee (must pre-register and only offered to first-time class attendees). These are fun informational sessions that last about an hour and are offered free to the public. Call me at (406)690-5690 or email me at heathermkirkpatrick@gmail.com to pre-register and reserve your free gift!


Tuesday, August 28, 2012

Calico Beans

Today I am sharing a dish that my husband made for a cook-out we went to last weekend. I really have the most amazing husband: he's a great provider, hard-working and ambitious, great with the kids, helps with the housework, and he can cook! Did I get a good guy or what?

This dish is called Calico Beans and the recipe came from Jared's mom Kelly, who, by the way, is undoubtedly one of the major reasons Jared turned out so well. I believe Kelly originally got this recipe from her Grandma Louise. Aren't family recipes fun?


Calico Beans
serves a crowd
printable recipe

3 cans of Pork and Beans
1 can garbanzo beans 
1 can black beans (rinsed)
1 can kidney beans (rinsed)
(you can play around with the kinds of beans, just use 6 cans total)
1 onion, chopped
1 tsp dry mustard
1/2 cup ketchup
2/3 cup brown sugar
1/2 cup white sugar
1 lb Jimmy Dean sausage

Brown the sausage over medium-high heat in a large heavy pot. Once sausage is cooked, dump all the other ingredients in and simmer over medium to medium-low heat until the onion is tender, about a half hour.

Serve hot alone or with chips or rice.

We had it as a side to hamburgers, which was delicious, but it would also make a great main dish as well.

Be sure to enter my giveaway if you haven't already!  

What is your favorite family recipe?

Monday, August 27, 2012

My First Giveaway!

To celebrate hitting 200 Facebook followers over the weekend, I am having my first giveaway! You've been hearing me talk about essential oils for awhile now, this is your chance to have three of my favorites for free!


This Introduction to Essential Oils kit contains 5 ml bottles of Lemon, Lavender, and Peppermint oils, as well as instructions on suggested uses. Check out at all the different uses for just these three oils:

*relieve insomnia
*soothe headaches
*bring down fevers
*soothe an upset stomach
*help relax
*uplift mood
*use on burns, cuts and scrapes to soothe and speed healing
*clear congestion
*clean and disinfect your home
*natural anti-oxidant
*and many more...

If you are the type of person who likes to look for natural cures for ailments before reaching for OTC meds or heading to the doctor for a prescription, you will love this kit.


To enter the giveaway:

Mandatory Entry: Just leave a comment telling my what your favorite scent is. Grandma's apple pie? Fresh laundry? Whatever you like, just make sure when you place your comment that you leave your email address so I can let you know if you win, whether that is by linking to your google account (make sure it has your email address on your profile!) or leaving your email in the comment.

Optional additional entries: If you would like to enter additional times, you can do this by one or more of these ways. Be sure to leave a separate comment for each entry:

*Facebook followers, leave a comment here saying you are a Facebook follower. If you aren't a Facebook follower yet, you can do that by clicking Like on the Facebook box to the left. But make sure to leave a separate comment here saying you did it, because I am not allowed to enter people via Facebook directly!

*Google followers, leave a comment here saying you are a Google follower. If you aren't a Google follower yet, you can do that by clicking Join this Site to the left. Again, make sure to leave a separate comment here saying you did it!

*Share this giveaway on your Facebook page (personal or business) for an extra entry. Just be sure to leave a comment saying you did this as well.

*Tweet this giveaway and leave a comment saying you did so.

Additional Rules and Conditions: $26.67 retail value. No purchase necessary. VOID where prohibited. This sweepstakes is only open to people 18 or older. Not valid outside of the U.S. I am the sole sponsor of this giveaway, doTERRA is in no way involved, and neither is Facebook. I will choose the winner on Tuesday, September 4 using random.org). All prizes will be awarded. If the prize is not claimed within 3 days of being awarded (by sending me a mailing address that I can send the prize to), I will draw another name. The claims made about the oils above are suggested uses, have not been evaluated by the FDA, and should not be substituted for the advice of your doctor.

Good luck everyone! Thank you for reading my blog!

Wednesday, August 22, 2012

Sweet Baby Ray's Birth Story, Part 1

This is the story of the labor and delivery of my third (and last) child, Stewart Raymond Kirkpatrick or "Ray." It is a story that I have been wanting to write for awhile, but just keep putting it off because in some ways it is equally too beautiful and painful to put into words.

***Warning: this is a post about childbirth, and while I tried not to make it too graphic it is childbirth after all! There is also a picture in which I am not dressed but nothing is showing. Please do not read if you are squeamish or easily offended. :-)

Here I am at 38 weeks pregnant

My labor with Ray began as did my labor with my second child: my water broke quite unexpectedly. Well, as unexpectedly as it can be when you are only a few days from your due date!  I had been overdue with both other kids and fully expected to be overdue again. My husband Jared was planning on heading to a mandatory work meeting in Las Vegas the next morning, so my mom had flown in earlier that evening to be with me and the kids while he was gone for three days. Once we got her settled in, we all headed to bed around 10 PM.

Around 11:30 PM, I woke up to a trickle feeling between my legs. I sat up with a gasp and told Jared, "I think my water just broke. Or maybe I peed myself, I don't know!" I headed to the bathroom but when no more fluid leaked out, I decided that I must have just had a slight bladder malfunction and went back to bed (with a towel under me, just in case). About ten minutes later it happened again and I knew for sure. My baby was on his way.

I called the midwife on call (I was giving birth at the University of Colorado with a group of nurse-midwives). I was having light contractions about 10-15 minutes apart so she told me to try to get some rest and call her at 6AM if things hadn't picked up before then. I tried to rest, but every time I laid down I would invariably have a super strong, painful contraction. I hate to labor in bed, so I sat on my birthing ball and paced for the next few hours. The contractions slowly picked up but were never really painful as long as I didn't lie down.

Around 6 AM I called the midwife and we decided that I should head in since things were gradually picking up and I did not want to get caught in rush hour traffic if baby suddenly decided he wanted to come now. With Hannah I had gone from very light contractions and 5 cm dilated then suddenly back to back double-peaking contractions and baby coming out in just over an hour, so it was in the back of my mind that could happen again!

We got settled into the hospital and my contractions and Ray's heartbeat were monitored for about a half hour. Since everything looked good (my midwife Jessica opted not to check my cervix yet so as not to introduce bacteria since it was obvious I still had some time left), they let me walk around the room as I wanted with only intermittent fetal monitoring.

From 8 AM to 11 AM I walked the room, chatted with my husband, and dealt with contractions as they gradually increased in intensity and frequency. It was an amazing time for the two of us. During my previous labors, we had never really been able to connect. Jared had tried to help me but in the middle of labor I had found myself more annoyed by him than comforted. It's terrible to admit, but true!

This time was different. As each contraction came, I would put my arms around his neck and he would massage my lower back and hold me. I was able to completely relax through the pain. Several times he massaged lavender on my lower back, which was soothing and calming. We also diffused doTERRA's Balance oil, a grounding blend. I felt that it kept me rooted and gave me confidence to capably handle my labor. It was painful but never overwhelming, never defeating, and I never felt like I couldn't handle it.

Around 11, my contractions were about five minutes apart and I asked if I could labor in the tub. My plan was for a water birth, but they didn't want the water to get too cool as the pool can only be filled once. We intended to fill the pool once I reached 7 cm, but I still had not been checked at this point. I think because I was still so calm, my midwife and nurse thought that I still had a ways to go. My midwife said I could labor in the tub as long as it didn't slow things down.

The tub was glorious! My contractions did not slow down one bit, but the warm water just took the edge off so I could relax. We continued to diffuse Balance and I listened to Josh Groban. I remember thinking I could do this every day, it was not bad at all!

After about 15 minutes, Jessica checked me. Her eyes widened in surprise and she softly told me "You are going to have a baby soon!" I was 8 cm dilated with just a little lip that she said if she pushed out of the way he would be on his way out. Since things were progressing so nicely and calmly we just decided to let things progress on their own. Jessica sat by the tub with a portable monitor and chatted with me and checked on the baby frequently.

Since I was so close, she did not think we would have time to fill the pool so we decided I would try a water birth in the tub, with the option to get out if I wanted. Outside the bathroom, the baby nurse was getting the warmer crib ready for Ray. She laughed at how relaxed I sounded as I moaned a little with the contractions then chatted happily with Jessica between them. "You sound like you're shopping on ebay in there!" she said.

With Hannah I had felt an unmistakeable urge to push, but over an hour went by and I never felt that. After awhile I asked Jessica to check me again. I was completely dilated except for that same little lip. She offered to push it out of the way during a contraction while I pushed, but warned me that it would hurt. I thought about it for a couple more contractions then decided to let her do it. Not fun! But it worked and I started to feel a bit of an urge. I tried pushing during the following contractions but it seemed just impossible. He felt so huge! We tried several different positions trying to get the pushing urge to get stronger: on my back, squatting, on my hands and knees...

Part of it was a mental thing, I think. My labor had been so calm and beautiful, but I knew that this next part would be intense and would hurt. I finally told myself to buckle down and push the baby out!

I'm not going to lie or sugarcoat this: for as calm as my labor was, the pushing stage was intense and crazy. I screamed like a banshee and shouted several times that there was no way I could do this! I was on my hands and knees (still in the water) and the head was out but I could not keep him submerged in the water. This is important during a water birth because if the cold air hits any part of the baby, it will stimulate him to take a breath which could cause him to aspirate water into his lungs. Jessica told me to stand up which was not an easy feat with a baby's head between my legs but I knew how important it was. I stood up in the tub and pushed him the rest of the way out.

"He's so sweet! Isn't he sweet?!" were my first words when I saw our baby boy. Jared looked a little shell-shocked but agreed. After our third baby he should have been used to it, but this birth was so primal and different (both other babies were born in the hospital bed), I didn't blame him for being a little speechless. Jessica let me sit in the tub for a few minutes and hold Ray in the warm water. He was perfect and beautiful. Pure bliss.


Then it was time to get out of the tub and birth the placenta. I handed the baby to Jared and stood up to walk over to the bed. A gush of blood suddenly streamed down my legs and I knew that something was horribly, terribly wrong.

To be continued...

Sweet Baby Ray's Birth Story, Part 2

*******************************************************

For more information on using essential oils during pregnancy and childbirth, please join me for this free online class:


Online Maternity, Labor and Delivery, Postpartum and Well Baby Care with Essential Oils Class

Simply click on the link below to join the meeting from the comfort of your own computer. You will be able to listen in, view the slides, and type in any questions you might have as we go.
We will be going over simple ways to use doTERRA Essential Oils for the following:

• Nausea and Indigestion • Morning Sickness • Heartburn, Acid Reflux • Hemorrhoids • Muscle Aches • Leg Cramps • Stretch Marks • Swelling and Water Retention • Labor and Delivery • Perineal Support • Oils for the New Baby • Postpartum for Mom • Breastfeeding • Well Baby Care
When
No Maternity Class scheduled at this time, contact me for more information
Where
http://www.anymeeting.com/kirkpatrick1


Tuesday, August 21, 2012

Southern Buttermilk Biscuits

This is my new favorite biscuit recipe. The biscuits turn out perfectly light and flaky. We found this recipe on food.com and haven't changed a thing. It's perfect as-is!


Southern Buttermilk Biscuits
yield: 10 biscuits
printable recipe  

2 cups unbleached all-purpose flour
1/4 teaspoon baking soda
1 tablespoon baking powder
1 teaspoon salt
 6 tablespoons unsalted butter, very cold
1 cup buttermilk (approx)

Directions: Preheat your oven to 450°F.

Combine the dry ingredients in a bowl, or in the bowl of a food processor. Cut the butter into chunks and cut into the flour until it resembles course meal. If using a food processor, just pulse a few times until this consistency is achieved. Add the buttermilk and mix JUST until combined. If it appears on the dry side, add a bit more buttermilk. It should be very wet.

Turn the dough out onto a floured board. Gently, gently PAT (do NOT roll with a rolling pin) the dough out until it's about 1/2" thick. Fold the dough about 5 times, gently press the dough down to a 1 inch thick. Use a round cutter to cut into rounds. You can gently knead the scraps together and make a few more, but they will not be anywhere near as good as the first ones.

Place the biscuits on a cookie sheet- if you like soft sides, put them touching each other. If you like"crusty" sides, put them about 1 inch apart- these will not rise as high as the biscuits put close together. Bake for about 10-12 minutes- the biscuits will be a beautiful light golden brown on top and bottom. Do not overbake.

Note: The key to real biscuits is not in the ingredients, but in the handling of the dough. The dough must be handled as little as possible or you will have tough biscuits. You also must pat the dough out with your hands, lightly. Rolling with a rolling pin is a guaranteed way to overstimulate the gluten, resulting in a tougher biscuit. You can make these biscuits, cut them, put them on cookie sheets and freeze them for up to a month. When you want fresh biscuits, simply place them frozen on the cookie sheet and bake at 450°F for about 20 minutes.

Monday, August 20, 2012

Washington, DC


Yesterday we returned home from several days in our nation's capital. We had a wonderful time with Jared's parents Stewart and Kelly, his younger sister Annie, and his older sister Katy, her husband Sean, and their three daughters: Anna, Elizabeth, and Jane. (Aren't those such beautiful, classic names?)

we were a little sad that the reflecting pool was empty

It was so fun to enjoy time with our family while seeing all the amazing sights in Washington DC. The first day we walked around and saw all the monuments. The new monument for Martin Luther King Jr was especially powerful.


The second day we toured the Capitol and visited the National Gallery of Art and the National Museum of Natural History. It was amazing to see where Congress meets and to view the incredible works of art at the museum, but the Museum of Natural History was far and away our kids' favorite of course!


The third day was a little more relaxed, starting with a leisurely breakfast at the hotel.


Then it was on to the National Zoo!


We walked so many miles overall, but our kids were total troopers and only tired and grumpy occasionally! By the end we were all amazed by how much we were able to accomplish with 6 kids, 4 of whom were ages 4 and under!

Monday, August 13, 2012

Buster Bar Dessert

Have you ever had one of these?

Dairy Queen's Peanut Buster Parfait
This is my mom's favorite treat from Dairy Queen. It's no surprise then, that my sisters and I grew up enjoying her homemade version, Buster Bar Dessert, at least once or twice each summer. 

These days, I make Buster Bar for my own family. Luckily they enjoy it as much as my sisters and I did!

The best thing about the homemade version is that it doesn't melt nearly as fast as the Dairy Queen dessert, so you can take your time and savor every bite!


Buster Bar Dessert
serves 15-20

1 package Oreo cookies (crushed)
1/2 cup (1 stick) butter (melted)
1/2 cup (1 stick) butter (yes, a second stick of butter)
1 can evaporated milk
2/3 cup semi-sweet chocolate chips
2 cups powdered sugar
1/2 gallon vanilla ice cream
1 (12 oz) container of spanish peanuts


Preheat oven to 350 degrees. Combine the crushed oreos and melted butter (1 stick) and press into the bottom of a 9x13 pan. Bake for 4 minutes then set aside to cool.


Combine butter, evaporated milk, chocolate chips, and powdered sugar into a 3 quart saucepan and place over medium heat. Bring to a boil then simmer for 10 minutes, stirring frequently (I forgot to take a picture but the chocolate sauce will be smooth and starting to thicken by the end of the 10 minutes). Remove from heat and allow to cool completely.


At this point the oreo crust should be cool. Spread the ice cream evenly over the oreo crust.


Now sprinkle the peanuts over the ice cream and place in the freezer.

Once the fudge sauce is cooled, pour it over the ice cream/peanuts and put the whole thing back into the freezer to chill for at least 2 hours.


When you are ready to serve, remove from the freezer and cut it into squares. Enjoy!


Thursday, August 9, 2012

My doTERRA story


Let's take a break from recipes and talk essential oils. 

I was first introduced to essential oils, in particular doTERRA essential oils, last summer. One of my friends invited me to a class that her sister Jenn was teaching about making homemade cleaners and spa products using common household ingredients (ie vinegar, baking soda, etc) and essential oils. Jenn is very knowledgeable and passionate about essential oils. It was a great class.


By the end of the class I was totally convinced that I needed to have some Lemon oil to try making some of my own cleaners. What do you know, it worked! Not only that, but it was actually kind of fun to clean with a fresh essential oil scent instead of harsh chemicals.


Next, I wanted to try some Lavender and On Guard, doTERRA's protective blend - good for strengthening the immune system. I used Lavender to make bath salts, fabric softener, and applied it topically when someone in my family needed help relaxing.


I started applying the On Guard on my children's feet every night before bed, and I soon noticed that they were not catching nearly as many colds, and when they did get a sniffle it stayed just that - a sniffle. This was amazing considering Nathan usually has one cold after another during cold and flu season.

By now, I was hooked, and my husband was a believer too! He and I had both taken On Guard internally when we had felt like we were getting sick and within hours felt better. (Not all essential oils can be taken internally - click here for more info on safely using essential oils).

So in December of 2012, I did what I should have done months earlier, I paid the $35 enrollment fee that allows you to receive wholesale pricing (a 25% discount). My Christmas present was ordering a beautiful diffuser and several other oils that I had been wanting. They arrived in plenty of time to be used during my labor with my third baby, and were invaluable in helping me to relax and lessening my discomfort during natural childbirth. But that is a story for another day.

Since then, I have been using the oils on a daily basis and have grown to love them even more. From the PastTense blend for headaches and tension, to Wild Orange for flavoring my water and putting me in a better mood, essential oils have enriched my family's life in so many ways. I have decided to be more active in sharing these oils with others because I have seen how they can help with so many things.

If there is a health concern that you have, please drop me a line at themenumama@gmail.com. I would be happy to send a sample out for you to try.

What are your greatest health concerns?
Do you enjoy learning about natural health alternatives? 

Tuesday, August 7, 2012

Healthy Thai Steak Tacos

This is Jared, my husband. He does not get a lot of face time on the blog, but truthfully he has created some of the best recipes on here.

Check out this recipe that he created: Philly Cheese-Steak Pizza.

Since Jared loves steak but we are both trying to eat more healthy foods, this recipe from How Sweet It Is immediately caught my eye. When I saw that it included mangoes (Jared's favorite fruit), I knew I had to make it.

Don't be intimidated by the ingredient list, these are quite easy to whip up. And you won't even miss the cheese or sour cream that are the usual unhealthy additions to tacos.

Healthy Thai Beef Tacos
serves 3-4
printable recipe

1 1/2 pounds flank steak
1 teaspoon salt
1 teaspoon pepper

marinade
3/4 cup light (canned) coconut milk
1 tablespoon sesame oil
4 garlic cloves, minced or pressed
2 teaspoons freshly grated ginger
2 tablespoons brown sugar
3 tablespoons freshly chopped cilantro
1/3 cup sweet chili sauce

quick mango salsa
1/2 mango, chopped
1 shallot, diced
1 jalapeno, diced
2 tablespoons freshly chopped cilantro
a sprinkle each of sugar, salt & pepper

tacos
1 teaspoon canola oil
8-10 corn tortillas
1/2 cup sweet chili sauce
1/4 cup peanuts, chopped
green leaf or romaine lettuce + fresh cilantro for topping

Sprinkle flank steak with salt and pepper. Combine coconut milk, sesame oil, chili sauce, garlic, ginger, sugar and cilantro in a bowl and whisk. Add flank steak to a ziplock bag or a shallow baking dish and pour marinade overtop. Refrigerate and let sit for 6-24 hours.

When ready to prepare, remove steak from fridge and let sit for 20-30 minutes. In a bowl, combine mango, shallot, jalapeno, salt, sugar and pepper, mix thoroughly, then set aside.

Heat a large oven-safe skillet (like cast iron) over high heat. At the same time, preheat the broiler in your oven. (You can also grill the steak if you wish.) Using a pastry brush, brush oil onto the skillet so there is only a very thin layer. Remove steak from marinade with kitchen tongs, placing in the skillet. Sear on both sides for 2-3 minutes.

Remove skillet and place is the oven directly under the broiler. Cook for 2-3 minutes, then flip and cook for 2-3 minutes more. This resulted in medium-rare meat for us, so cook for longer if you like your steak cooked more. Our steak was about an inch thick.

Remove skillet from oven, and place steak on a cutting board to rest for 15-20 minutes.

At this time, assemble your tortillas (warm them if desired), salsa, extra chili sauce for drizzling and cilantro. After the steak has rested, slice it into thin strips.

Assemble tacos as desired and eat! So flavorful and satisfying. My pictures really don't do this meal justice, I highly recommend checking out Jessica's blog at How Sweet Eats for some amazing pictures and more delicious recipes!

What fruit are you loving this summer? I can't seem to get enough of the cherries this year!


Monday, August 6, 2012

It's a Hard Knock Life...

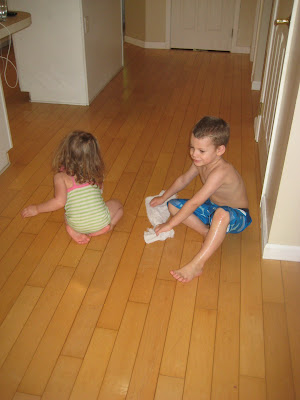
This morning I ripped up a couple of old towels, dressed my kids in their swim suits, put on some kids music and had them scrub the floors with me.


We used doTerra's On Guard Cleaner Concentrate to make the mop water, so it was non-toxic. I loved not having to worry about their skin, their eyes, or their clothes!


I know, kind of reminds you of Little Orphan Annie a little, doesn't it? They were having fun though! In fact, I couldn't even get Hannah to smile at the camera, she was having too much fun scrubbing!


My floors look great! This may become a weekly routine.

What chores do your kids help you with?

***New recipe coming tomorrow!!!

Thursday, August 2, 2012

Raspberry Cream Pie

Lately I have been trying not to make the Pioneer Woman's recipes. The problem is not that they are bad. On the contrary, they are usually very good. Too good. And very rich, which is not at all helpful when you are trying to lose weight.

Have I mentioned that I have lost 50 pounds in the last six months?


Okay, almost 10 of those pounds was Ray, but still! 


I didn't lose the weight by eating Pioneer Woman recipes every day, that is for sure. I will talk in future posts about what has been working for me, as far as eating healthier and getting into shape. For now, I will just say this: I do occasionally have treats. I love to make dessert, but I try to do it when there are plenty of other people around to eat the sweets with me. Otherwise I will end up eating the whole thing. No will power, people!

If you want a summer treat, this is a great recipe to try. One of the guests that I served it to even said, "I could eat this all day!" I tweaked the recipe just a little bit, using a little less sugar than Pioneer Woman, and substituting greek yogurt instead of regular. Oh, and just a tip - definitely make your own Oreo crust like the recipe says, the storebought versions just aren't as good!


Raspberry Cream Pie
serves 8 
printable recipe

25 whole Oreo cookies 
4 Tbsp melted butter
1 generous cup of raspberries
1 Tbsp sugar
2 (6 oz) containers of raspberry yogurt (I used raspberry greek yogurt)
1 (3.4 oz) package of vanilla instant pudding
1 cup heavy whipping cream
extra whipped cream and/or raspberries for garnish, if desired


Preheat oven to 350F. In a food processor, pulse the cookies until they are crushed. Before I had a food processor I would put the cookies in a ziploc bag and use a rolling pin to crush them! Mix the melted butter in with the crushed cookies and press them into the bottom and up the sides of a pie pan. Place in the oven and bake for 3-4 minutes, just so the crust hardens. Remove from oven and set aside to cool.


Wash raspberries and spread out on a plate. Sprinkle the sugar on top and let them set and sweeten while you mix up the other ingredients.


Combine the yogurt and pudding mix (just the powder) in a mixing bowl. Beat on low for 1 minute. Add the heavy cream and beat on low for 30 seconds. After pausing to scrape down the sides of the bowl, beat on medium-high for 2 minutes or until mixture is thick.


Gently fold the raspberries into the cream mixture, then spoon into the cooled pie crust and spread evenly. Freeze for at least two hours so the pie can set. About 20-30 minutes before serving, remove the pie from the freezer so that it will be easier to serve. It tastes yummy straight from the freezer, but it is hard to cut when it is frozen! Garnish with whipped cream and raspberries.


What is your favorite summer dessert?


Wednesday, August 1, 2012

Becoming a Better Mom

I originally started this blog as a way to share recipes and meal plans with my friends, as well as catalog them for myself for future reference. As my interests grow and change, this blog is morphing with them. Don't be surprised if you find me writing about topics other than cooking. I am looking forward to having discussions on parenting, fitness, natural healthcare (I am especially passionate about essential oils), homeschooling my preschoolers, and my faith.

Lately the topic that has been on my mind a lot is becoming a better mom. I am trying to challenge myself with new ways to have fun with my kids, educate them, and most importantly nurture them and help them grow into independent happy adults.

As I said in my blog post yesterday, I am constantly struggling with finding a balance between paying attention to all three of my young children and keeping up with my responsibilities around the house like cooking and cleaning. This fellow mommy blogger has come up with a great solution, check out her series of posts titled Why I Cook with My Children.

I need to be better about getting the older two in the kitchen with me!
I have also been struggling with discipline strategies. I tend to be too harsh with my kids, especially my oldest. I realize this is all relative and everyone has different parenting styles. The bottom line for me though is that my current parenting style is not how I want my parenting to be. It is not creating the kind of relationship that I want long-term with my kids.

I am a firm believer that I create my own destiny, so I know that I can change this. And frankly, the sooner the better before our bad habits are too ingrained. Some things I would like to stop doing are yelling and being impatient, typical mom things! I find that most days I am too focused on immediately stopping my kids' behaviors that I don't like, instead of trying to figure out what is causing those behaviors (like whining) in the first place.

I like to read good books to help me come up with solutions to problems I am having, so based on the recommendations found on ahaparenting.com I ordered these two books on Amazon:

I will be sure to let you know how I like the books after I read them!

Another slightly different way that I am working to improve my parenting is by learning more about natural forms of healthcare, specifically essential oils. Essential oils are for so much more than aromatherapy! They can be used to treat so many problems including ear infections, insomnia, depression, fevers, asthma, and so much more.

In fact, this morning I am especially excited as my youngest, Ray slept through the night last night for the first time ever - 11 hours! The longest he has ever slept before was 5 hours and it is usually more like 3-4 hours at a time. The only thing I did differently was apply a couple of drops of Serenity essential oil blend (has lavender, ylang ylang, chamomile and some others) on his spine and behind his ears, which was the first time trying this blend on him. You had better believe he won't be going to bed without this oil from now on!


I will be blogging more about this in the future, as it is really empowering to me. However, if anyone is curious to learn more in the meantime, my friend Julie Driggs is teaching a free webinar called Dr Mom, all about using essential oils on our children. She has such great information to share. It is open to the public, so if anyone would like to listen in, simply click on this link: http://www.anymeeting.com/azdoterra1 at 7 PM MST on Thursday, August 2.

In what ways are you striving to be a better mom, or a better person in general?
Have you read any good books lately? 

***Check back tomorrow for a new recipe! I served it to dinner guests that we had Sunday evening and the wife said, "I could eat this all day!"